
This Red Velvet Cheesecake Cake is my family’s favorite cake recipe ever.
Watch the video showing you how to assemble this Red Velvet Cheesecake cake. Then scroll to the very end of the post to print out the recipe so you can bake it at home.

If you’ve ever been to The Cheesecake Factory, and if you’re a Red Velvet Cake Fan… you’ve probably ordered up the Red Velvet Cheesecake Cake.
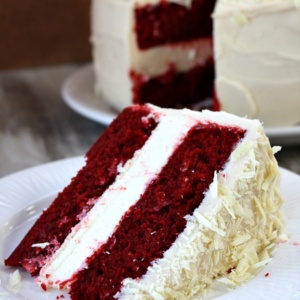
It’s kind of the most amazing thing ever… a red velvet layer-cake with a layer of cheesecake mixed in… topped with cream cheese icing.

It really is the most beautiful cake to bake for special occasions. It’s impressive looking, and it’s always well received by your guests. It’s delicious too!
How to Make A Red Velvet Cheesecake Cake:
It starts with a half-recipe for classic cheesecake, baked in a water bath (details in the recipe below). The red velvet cake is made in two 9-inch-rounds- made nice and flat and even on top with the aide of cake strips.

For ease of handling, the cheesecake layer is frozen. Then it’s sandwiched in-between the two cake layers. No frosting is needed in between layers.

First things first- you apply a crumb-coat of the cream cheese frosting. The crumb-coat is a very thin layer of frosting that you spread on all around the cake.
There is an absolutely fabulous video on how to apply a crumb-coat HERE. After the crumb-coating, you’ll refrigerate the cake for about 30 minutes to set the crumb layer.

Next, you can add the rest of the frosting. Start with a generous scoop of frosting on top.

Just spread it on, or pipe it on, or decorate it how you wish. The crumbs are all tucked away in the crumb-coat layer, so you shouldn’t have any red crumbs floating around in your next layer of frosting.
There is another fabulous video showing how to apply a smooth layer of frosting to a cake HERE.

See? A nice, smooth layer of frosting without any red crumbs.

Add some decor to the top– piped on frosting or shaved white chocolate, as I added here.
To shave the white chocolate, I microwave a thick chunk of white chocolate for about 20 seconds to soften it up a bit, then use a potato peeler to shave/curl some decorative pieces. Then I just gently place them on top of the cake.

The thought of that red velvet inside is too much to bear… I can never wait to cut into this cake!!

The cake itself turns out super moist and tender and perfect.

The cheesecake layer softens up and is perfect and velvety in the center. It’s almost like a giant interior layer of frosting, except that when you bite into it you realize that it’s CHEESECAKE instead.
I don’t know if I’ve ever professed my love for cheesecake before, but for me it’s up there in my top 10 favorite desserts (along with Red Velvet Cake)… so this dessert is like the perfect thing for me.

Piece of Cake cookbook
Lots of folks buy those boxed cake mixes because they don’t want to bother with the mess of trying to make a cake homemade. This recipe comes from the most wonderful from-scratch cake book: Piece of Cake by Camilla Saulsbury.
Saulsbury’s cake recipes are all ONE BOWL recipes… this means no mixing things in separate bowls and no sifting. Her recipes do not call for any fancy flours and you will not need a heavy-duty stand mixer.
Here’s a sneak peek at a few of the cake recipes within this book:
- Traditionalists: Perfect Chocolate Bundt, Classic Vanilla Pound Cake, New York Style Crumb Cake
- For Trendsetters: Salted Caramel, Peanut & Chocolate Upside-Down Cake, Polenta Cake with Anise & Honey, 5-Spice Mandarin Orange Cake
- For Grown Ups: Tennessee Whiskey Cake, Champagne Pound Cake, Gingerbread Cake with Orange-Mascarpone Cream
- Little Ones: Cinnamon Graham Cracker Snack Cake, Strawberry- Peanut Butter Crumb Cake, Snickerdoodle Bundt
- For Hedonists: Caramel Cinnamon Roll Bundt, Chocolate Texas Sheet Cake, Hot Fudge Brownie Cake
- For the Health Conscious: Whacky Whole Wheat Banana Cake, Mixed Berry Spoon Cake, Whole Wheat Carrot Bundt
Saulsbury also includes recipes for homemade Vegan and Gluten Free cake mix. And all of her measurements include metric as well as standard (a world-friendly baking book). With 5-star reviews on Amazon, this is definitely a cookbook to have on your cookbook shelf!
If you like cheesecake cakes, you might also enjoy this pretty Raspberry Cheesecake Cake or my decadent Chocolate Peanut Butter Cup Cheesecake Cake.
Red Velvet Cheesecake Cake
Ingredients
CHEESECAKE:
- Two 8-ounce packages cream cheese, at room temperature
- ⅔ cup granulated white sugar
- pinch of salt
- 2 large eggs
- ⅓ cup sour cream
- ⅓ cup heavy whipping cream
- 1 teaspoon vanilla extract
RED VELVET CAKE:
- 2½ cups all purpose flour
- 1½ cups granulated white sugar
- 2 tablespoons unsweetened cocoa powder
- 1½ teaspoons baking soda
- 1 teaspoon salt
- 2 large eggs, at room temperature
- 1½ cups vegetable or canola oil
- 1 cup buttermilk
- ¼ cup (two 1-ounce bottles) red food coloring
- 2 teaspoons vanilla extract
- 2 teaspoons white vinegar
CREAM CHEESE FROSTING:
- 2½ cups powdered sugar, sifted to remove lumps
- Two 8-ounce packages cream cheese, at room temperature
- ½ cup (1 stick) unsalted butter, at room temperature
- 1 tablespoon vanilla extract
Instructions
PREPARE THE CHEESECAKE LAYER:
- Preheat oven to 325 degrees F. Place a large roasting pan on the lower third rack of the oven. Place a kettle of water on the stove to boil. Spray a 9-inch springform pan with nonstick spray and line the bottom with a round of parchment paper. Wrap a double layer of foil around the bottom and up the sides of the pan (you want to seal it so the water from the water bath doesn't seep into the pan). In a large bowl, use an electric mixer to mix the cream cheese- blend until it is nice and smooth and creamy. Mix in sugar and salt and blend for 2 minutes, scraping down sides of the bowl as needed. Add eggs, one at a time, blending after each addition. Finally, mix in sour cream, whipping cream and vanilla. Mix until smooth. Pour the batter into the prepared pan. Set the pan into the roasting pan in the pre-heated oven. Carefully pour the hot water from your kettle into the roasting pan (it will fill the pan surrounding the cheesecake). Pour enough water so that there is about an inch of water coming up the foil along the sides of the cheesecake pan. Bake the cheesecake for 45 minutes. It should be set to the touch and not jiggly. Remove the cheesecake from the roasting pan and let it cool on a wire rack for at least an hour. When it has cooled, place the pan into the freezer and let the cheesecake freeze completely. This can be done in several hours- or overnight.
PREPARE THE CAKE LAYERS:
- Preheat oven to 350 degrees F. Grease and flour two 9-inch round metal baking pans (or spray with nonstick baking spray with flour). In a large bowl, whisk together flour, sugar, cocoa powder, baking soda and salt. Add eggs, oil, buttermilk, food coloring, vanilla and vinegar to the flour mixture. Using an electric mixer on medium-low speed, beat for 1 minute, until blended. Scrape sides and bottom of bowl with a rubber spatula. Beat on high speed for 2 minutes. Spread the batter evenly into the prepared pans, dividing equally. Bake 30 to 35 minutes or until a toothpick inserted in the center comes out with a few moist crumbs attached. Let cool in pans on a wire rack for 10 minutes. Run a knife around the edge of the pans, then invert cakes onto a rack to cool completely.
PREPARE THE FROSTING:
- In a large bowl, using an electric mixer on medium-high speed, beat powdered sugar, cream cheese, butter and vanilla until it is smooth and creamy (do not over beat).
ASSEMBLE THE CAKE:
- Place one cake layer into the center of a cake plate or platter. Remove the cheesecake from the freezer, take off the sides of the pan, and slide a knife under the parchment to remove the cheesecake from the pan. Peel off the parchment. Measure your cheesecake layer against the cake layers. If the cheesecake layer turns out to be a slightly larger round than your cake, move it to a cutting board and gently shave off some of the exterior of the cheesecake to get it to the same size as your cake layers. Place the cheesecake layer on top of the first cake layer. Place the 2nd cake layer on top of the cheesecake.
FROST THE CAKE:
- Apply a crumb coat layer to the cake- use a long, thin spatula to cover the cake completely with a thin and even layer of frosting. Be sure to wipe off your spatula each time you are about to dip it back into the bowl to get more frosting (this way you won't be transferring any red crumbs into the bowl of frosting). Don't worry at this point about the crumbs being visible in the frosting on the cake. When your cake has a thin layer of frosting all over it, place it into the refrigerator for 30 minutes to "set" the frosting. Once the first layer of frosting is set, apply the 2nd layer. Start by adding a large scoop of frosting onto the top of the cake. Use a long, thin spatula to spread the frosting evenly across the top and then spread it down the sides of the cake too. Because you applied a crumb-coat layer, you shouldn't have any red crumbs floating around in the final frosting layer. Decorate, as desired. I recommend white chocolate shavings (see *Tips below). Keep this cake refrigerated.
Notes
- *For making white chocolate shavings: Purchase a hunk of white chocolate. Microwave the chocolate to soften it up slightly (15 to 30 seconds, depending on the size). Use a potato peeler to run down the side of the chocolate to create shards/shaves/curls of white chocolate. I like to shave it onto a paper plater and then just use the plate to slide the chocolate onto the top of the cake.
- *If you are serving this cake at a party, it's perfectly okay to leave the cake at room temperature for an hour or so while serving. Otherwise, keep it in the refrigerator. It also freezes perfectly! I made my cake one day and then just placed it as-is in the freezer and pulled it out the next day. It thaws quickly.
Nutrition
Nutrition information is automatically calculated, so should only be used as an approximation.


I love Red Velvet Cake! I love all cakes made from scratch and this one looks amazing!
I made this for Christmas dinner dessert! Everyone LOVED it! I couldn’t leave it alone. It was so moist. Just perfect!
Thanks for the great recipes!!
Hi Lori, This came up on my pinterest page and I was struck by the crazy beautiful color! Perfect for upcoming Valentine’s Day. 🙂 Thank you so much for watching the cake decorating videos, I’m thrilled they were helpful! Cheers, Zoë
Thank you- I do my frosting like that with every cake I make now. Thank YOU! 🙂
I will be making this receipe on Valentine’s day for a dinner party, could I use fondant to covert the cake instead of another layer of cream & shaved chocolate?
thank you
I have never worked with fondant, so I’m not sure!
I made this yesterday and brought it to work today. It is wonderful and looks just like the picture. HOWEVER, when putting the cake batter together, DO NOT beat on medium-low during the first minute. I did this and the cake spattered EVERYWHERE. Luckily, I caught it in time and I didn’t lose too much of it. Just put in on stir, for that first minute. It is just to liquidy. Other than that, this is a GREAT cake. How can I post a picture?
Glad you enjoyed it! You can post a photo to my Facebook page, if you’d like. I’d be happy to share it with my fans!
I would like to say I made Red Velvet Cakes, But tried this one twice already and everyone I know loves it. PS I put pcans all around the cake
Tastes great, looks awesome. ????
I have this book and it’s an awsome book. But why my cream cheese frosting melts??!!!!
Melts? I have no idea.
okay so i spray the inside with cake release and then i put a piece on parchment paper in the inside and spray that too?? and then i add the foil paper in the inside double time and pour the cheesecake on the foil paper inside the pan ??
Please look at the photos in the post. The foil is on the outside of the pan.