This Raspberry Cheesecake Cake recipe is perfect for celebrations.

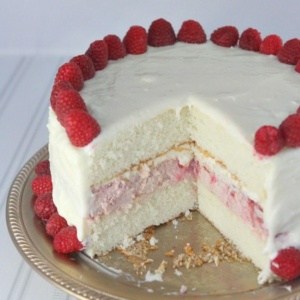
It’s another cheesecake cake!! Let’s celebrate! Readers have been writing in and asking me to create another one. With the holidays approaching, I thought I’d take the opportunity to create something special and pretty to use for your holiday gathering. My favorite dessert ever is cheesecake. It’s great to make cheesecake for guests since everyone seems to always enjoy it, but why not add some cake to it too? Adding raspberries (our all-time favorite berry in the RecipeGirl household) makes my favorite dessert even better! This cake is made up of two tender layers of white cake with raspberry cheesecake sandwiched in the middle. The whole cake is covered with a delicious cream cheese frosting, and it’s garnished with fresh raspberries.

This dessert begins with making a raspberry cheesecake (with fresh raspberries mixed in, of course!)

And then you also need two layers of white cake. You want the layers to be as flat as possible, which you can achieve by using Bake Even Strips. I love this product- it works perfectly for turning out flat (not mounded) cake layers every time!

How do you Make a Raspberry Cheesecake Cake?
- Place one layer of cake on your cake platter, sliding pieces of parchment or wax paper under the sides (to make frosting the cake less messy).
- Spread a light layer of frosting on top of the first layer of cake.
- Place the frozen cheesecake on next.
- Spread a light layer of frosting on top of the frozen cheesecake.
- Place the 2nd layer of cake on next
- Spread a light layer of frosting over the whole cake. At this point, you’ll put it in the refrigerator to set the “crumb coat” of frosting. Then you can take it out and cover the cake with another layer of frosting to finish.

You’ll want to garnish this beautiful celebration cake with gorgeous, fresh raspberries. I opted to edge the bottom and the top. Simple stuff, nothing fancy needed since the raspberries are so pretty.

This is a cake that you’ll need to keep refrigerated since it has a cheesecake hiding inside. When you cut into it, you’ll be able to see that delicious raspberry layer in the middle.

Your guests will have the luxury of being able to eat both cake and cheesecake in the same dessert. It’s kind of a win-win, right? It’s an impressive dessert for celebrations like birthdays and holidays!
Raspberry Cheesecake Cake
Ingredients
Cheesecake:
- Two 8-ounce packages cream cheese at room temperature
- 2/3 cup granulated white sugar
- pinch of salt
- 2 large eggs
- 1/3 cup sour cream
- 1/3 cup heavy whipping cream
- 1 tablespoon seedless raspberry jam
- 1 teaspoon vanilla extract
- 3 drops red food coloring
- 1 tablespoon all purpose flour
- 1½ cups fresh raspberries halved
White Cake
- 1 cup whole milk
- 6 large egg whites (3/4 cup)
- 1 tablespoon vanilla extract
- 2¼ cups cake flour
- 1¾ cups granulated white sugar
- 4 teaspoons baking powder
- 1 teaspoon salt
- 3/4 cup (1½ sticks) unsalted butter at room temperature
Frosting and Garnish:
- 2½½ cups powdered sugar
- 2 8-ounce packages cream cheese at room temperature
- 1/2 cup (1 stick) unsalted butter at room temperature
- 1 tablespoon vanilla extract
- fresh raspberries for garnish
Instructions
Prepare the cheesecake layer:
- Preheat the oven to 325 degrees F. Spray a 9-inch springform pan with nonstick spray. In a large bowl, use an electric mixer to mix the cream cheese- blend until is is nice and smooth and creamy. Mix in the sugar and salt and blend for 2 minutes, scraping down the sides of the bowl as needed. Mix in the eggs. Then mix in the sour cream, whipping cream, jam, vanilla and food color (if using). Sprinkle in the flour and mix that in too. Gently stir in the halved raspberries. Scrape the batter into the prepared pan. Bake for 50 to 60 minutes, or until the cheesecake is set to the touch and not terribly jiggly. Remove the cheesecake from the oven and let it cool on a wire rack for about an hour. When it has cooled, wrap the pan with plastic wrap, place the pan into the freezer and let the cheesecake freeze completely. This can be done several hours ahead (or overnight).
Prepare the cake layers:
- Preheat the oven to 350 degrees F. Spray two 9-inch pans with cooking spray, line the bottoms with rounds of parchment paper, then spray again (I like to use the Pam Baking Spray with flour). In a medium bowl, whisk together the milk, egg whites and vanilla. In a large bowl, whisk together the flour, sugar, baking powder and salt. Add the butter and mix on low- you'll end up with a crumby mixture. Add half of the liquid mixture to the dry ingredients and beat at medium speed until incorporated. Add the remaining liquid and continue to mix for 1 1/2 minutes, until everything is well-combined and smooth (scraping the sides of the bowl, as needed). Divide the batter evenly between the two pans. Bake 25 to 30 minutes, or the tops are completely set and a toothpick inserted into the center comes out clean. Let the cakes cool in their pans for at least 20 minutes, then run a knife along the sides and turn them onto a cooling rack to cool completely (don't forget to remove the parchment paper). Once cooled, wrap them each in plastic wrap until you are ready to assemble the cake.
Prepare the frosting:
- In a large bowl, using an electric mixer on medium-high speed, beat powdered sugar, cream cheese, butter and vanilla until it is smooth and creamy (do not over-beat).
Assemble the cake:
- Place one cake layer into the center of a cake plate or platter. Spread a small amount of frosting onto the cake. Remove the cheesecake from the freezer, Run a knife along the edge of the pan, take off the sides of the pan, and slide a knife under the cheesecake to release it from the bottom of the pan. Measure your cheesecake layer against the cake layers. If the cheesecake layer turns out to be a slightly larger round than your cake, move it to a cutting board and gently shave off some of the exterior of the cheesecake to get it to the same size as your cake layers. Place the cheesecake layer on top of the first cake layer. Spread a small amount of frosting onto the cheesecake. Place the 2nd cake layer on top of the cheesecake.
Frost the cake:
- Apply a crumb coat layer to the cake- use a long, thin spatula to cover the cake completely with a thin and even layer of frosting. Be sure to wipe off your spatula each time you are about to dip it back into the bowl to get more frosting (this way you won't be transferring any crumbs into the bowl of frosting). Don't worry at this point about the crumbs being visible in the frosting on the cake. When your cake has a thin layer of frosting all over it, place it into the refrigerator for at least 30 minutes to "set" the frosting. Once the first layer of frosting is set, apply the 2nd layer. Start by adding a large scoop of frosting onto the top of the cake. Use a long, thin spatula to spread the frosting evenly across the top and then spread it down the sides of the cake too. Because you applied a crumb-coat layer, you shouldn't have any crumbs floating around in the final frosting layer. Decorate, as desired with fresh raspberries. Keep this cake refrigerated.
Notes
- On cake flour: Yes, you need to use cake flour. If you don't wish to buy it though, you can easily make your own: Measure out your 2 1/2 cups of all-purpose flour, remove 4 tablespoons, and then add in 4 tablespoons of corn starch. Whisk together your flour and cornstarch, and then sift. A lot. You now have cake flour!
- On clear vanilla extract:
You don't have to use clear, but if you're shooting for really white cake... it helps. You can buy it cheap online: Clear Vanilla Extract. - On raspberries: Definitely use fresh raspberries, not frozen.
- On getting flat cake layers: I recommend Bake Even Strips (you can order on Amazon). They are cheap, and they work perfectly for creating flat, even cake layers.
- On high altitude baking of the cake layers: (above 5,000 feet, reduce sugar by 1/4 cup, reduce baking powder by 1/2 teaspoon, and add an additional tablespoon of milk.
Nutrition
Nutrition information is automatically calculated, so should only be used as an approximation.
Here are a few more raspberry cake recipes you might enjoy:
- Chocolate- Raspberry Cake by My Baking Addiction
- Perfect Party Cake by RecipeGirl
- Raspberry Magic Custard Cake by Baking a Moment


I can’t wait to make this cake for a Mother’s Day party! YUM!
Thanks for this awesome recipe. I plan on baking this receipe today for my daughter’s birthday party with family this evening. For planning purposes, can you confirm if the cake needs to defrost in or out of the fridge and for how long before serving? Also, can I use salted butter for the cheesecake and cake, and omit the salt? So sorry, lastly it appears this recipe on Driscoll’s website was adjusted. Your opinion on which one tastes best/is more simple to make? Many thanks and blessings!
Hi Tiffany, I’m sorry for the late response. The cake can defrost inside the refrigerator. Salted butter is fine. And since I created the recipe, I believe my recipe is the best over the other. Thanks!
Hi Just wondering if the cheesecake layer defrosts when it has been in the fridge for a while??
yes!
Can this cake be frozen ahead of time then day of frosted?
I think that would be fine- as long as you wrap each layer well.
I’m getting ready to make this cake in a few days. While reading over the directions, I’m confused about the making of the cake. Which bowl is the butter added to? Is either in a mixer? I’m accustomed to wet ingredients being in the mixer and adding dry to it, but the mention of a crumbly texture confuses me. Please advise. Thank you! Can’t wait to make this!
The butter is added to the flour mixture until crumbly. The liquid is added in gradually.
Is a beautiful cake
Perfect for any occasion
Someone was asking for Gluten free conversion for the cake. Walmart and other stores carry Gluten free Betty Crocker, Dunken Hines and King Arthur brands. To be honest I have not had the white cake mix but the chocolate is AMAing and I don’t eat Gluten free. Nobody that has ever had it has had no idea and loved it.
Thanks
Randy
I am excited to make this cake this weekend. Why is the cheesecake layer frozen, to keep from falling apart during frosting? Also, is there excess moisture when the cheesecake layer defrosts? I’m trying to figure out if the cake will hold together without getting soggy for a day or two. Thanks for your help and recipe.
Dawn
Hi Dawn, the cheesecake is frozen so it’s easier to handle and does not fall apart while assembling. I’ve never had any trouble with anything getting soggy. Best to serve the day of assembling or maybe the day after.
I just made this for our Eater dessert. I can’t praise it enough. Due to time constraints I used a white box cake mix. I would really recommend freezing the cheese cake overnight. It was delicious and a big hit with my family!
Martha has the same idea as me….STRAWBERRIES. And then in the icing between layers add strawberry compote and chopped strawberries. ( can u tell I like strawberries?). I guess I’ll freeze it with each layer to keep it from sliding and also do a crumb coat layer. I’ll let u know when it’s done and how it works out!!!!