As a former teacher, I’m a natural sucker for cuteness and kids. I’m the Mom that that makes sure that her son has a cute backpack/lunch box (Red Sox, of course), cute haircut (just short enough to spike, if needed), and cute clothes (collared shirts and preppy shorts to school). I’m sure my kid could care a less about that sort of thing, but I know he’ll thank me later.
When the sport’s team parties come around, I’m the sucker who volunteers to create end-of-the-season treats. Our undefeated soccer team deserved something special this year: Soccer Ball Cookies.
Never having made Soccer Ball Cookies, I googled the title and didn’t care for a single picture that I saw. They all looked a little too much… well… not like soccer balls. So I came up with my own plan… a three day cookie project. Here’s a little tutorial on how to make soccer cookies!
 Day One: I made my usual No-Fail Sugar Cookies recipe. It’s actually a delicious recipe, and the cookies are easy to roll and cut. Compliments are always abundant on how these taste. I edged each cookie with a slightly thick, white Glace Icing. This icing recipe is very forgiving… if it’s too soupy, just add more powdered sugar, and if it’s too thick, just add a little more milk until it’s a desired consistency.

Once the edges were set up a bit, I spooned a slightly thinner version of Glace Icing into the centers. Gently pushing the icing to the edge, the border acted as a dam that contained the icing and did not let it overflow onto the table.

I googled “hexagon images” and came up with several size choices for the shape. I cut it out, traced it on thin cardboard and had my desired pattern. The approx. 1 1/2-inch pattern was used to trace the hexagons on all of my cookies (with the thin tip of a sharp knife). I found it was really easy to mark the lines while the icing was still slightly soft. It would have been much easier to use a hexagon cookie cutter to create the same indentations, but I wasn’t thinking far enough ahead to order one in time.

Day Two: Once the white icing had an opportunity to harden, it was time to tackle the black icing. I used a whole bottle of black food coloring for a half recipe of Glace Icing. This assured a nice, dark black color. I was careful to make the black icing thick enough so that it would hold its form through a thin tip but thin enough to get through the hole of the tip easily. I should mention that I used liquid food coloring, which made the regular icing recipe super thin. I simply added additional powdered sugar until it reached the desired consistency.
This was the messiest and most difficult part of the whole process. Messy, because my hands were blackened with the whole process but all rinsed away without a problem. Difficult, because you really must have a steady hand and you must be careful not to drip the black icing onto other parts of the cookie or onto other cookies.
I carefully edged every imprinted hexagon- as shown in the picture- and then let those edges set up until slightly hardened. The nice thing about this part is that if you get tired at any point during decorating, just slip the icing tub into a ziploc bag while you relax for a while.

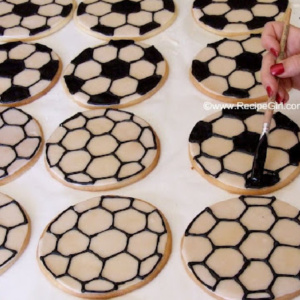
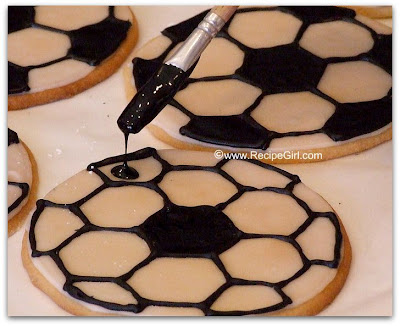 I then used a clean painbrush to ‘paint’ on the remainder of the black icing onto the hexagons… starting with the center hexagon and then coloring in alternating hexagons on the edges.

 Here’s the finished cookie. Amazingly enough, I didn’t screw up a single cookie. I was psychotically careful about the whole process. This recipe makes exactly fifteen 6-inch-diameter cookies. You can make them any size you want, but I really wanted enough room for the hexagons to ‘pop’ and I also wanted them to look as realistic as possible. Since I don’t have a 6-inch-round cookie cutter, I used a tupperware bowl… just turned it upside down and used the top of it as a cutter.
 Day Three: After the icing had a good 24 hours to harden completely, each cookie was packaged individually with little tags for the kid’s names.
 I brought a basket of my finished Soccer Treats to the team party. Note to self… lay all cookies flat next time (sadly, a couple of the cookies broke in half when they were standing upright in the basket… they had softened slightly since we’re having unusually warm 85 degree weather at the moment).
Broken or not, they were almost as big of a hit as the trophies. Congratulations Fireballs… on an excellent season of dribbling, kicking, and scoring, as well as great coaching & teamwork!
Next up is basketball season… that’s a whole lot of orange icing!



Hi I was wondering when you leave the cookies out so the glace will dry, will the cookies get hard??
The cookies firm up slightly… but you want that. You don’t want them bending or breaking apart after you have done all of that nice decorating!
These look fantastic!!!! So I made the cookies and about to ice them but wondering since you said it can take up to 12 hours to dry where do I store them? On the counter or in the fridge? Thanks!!
I leave mine on the kitchen table overnight.
Very nice cookies, I did make them and they looked real nice. I am a little lazy, I could not see myself
tracing around that hexagon over and over, so I copied and pasted a picture of the cookie edited it the same size as my cookie and printed it off. I then cut out only the black hexagon shapes and traced around them. like making a patteren for the cookie. After all the cut out are traced around, you can connected them with the lines using the picture as a guide.
Thanks for the great idea, my grandson will like them.
I am SO impressed. I have to do stars for a church event next month, and I’ve been dreading all the work, and they won’t be nearly as intense as these!
So cute. My son plays hockey. It will be a lot easier to make pucks!
These are fabulous! Your kids must rise up and call you blessed.. because you definitely score high marks on my tally card!!
..and I am not so good at keeping up with the kids’ haircuts, so when I see the darling little boys all lined up at Sunday school with perfectly spiked hair I have to applaud all those moms.. and the boys for staying still long enough to have hair glue added! 🙂
You are super mom – oh my gosh! I would have gone crazy making those. I bet the team was thrilled to pieces! What a labor of love.