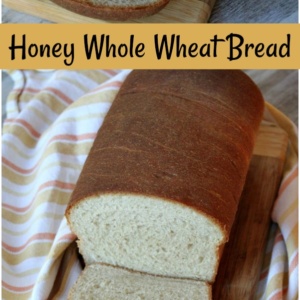
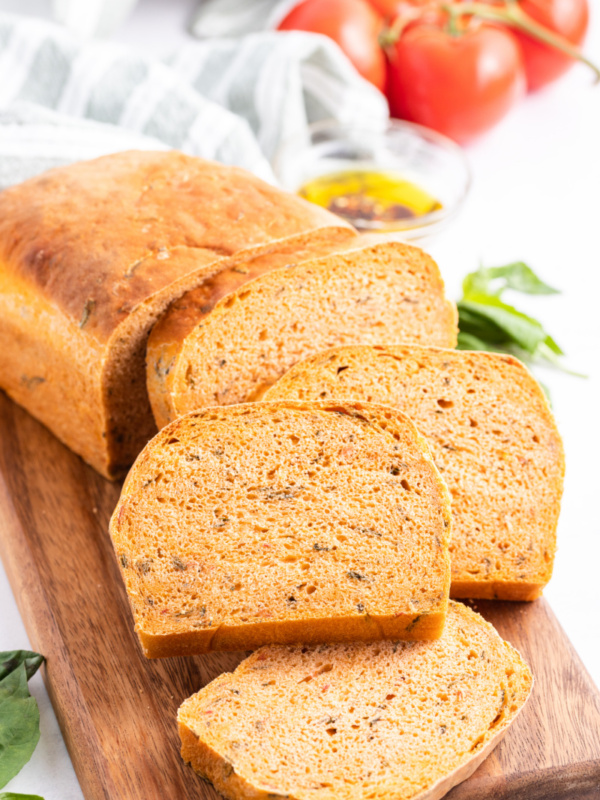
This recipe for Honey Whole Wheat Bread is the best sandwich bread recipe. I’ve been using it for so many years, and I get emails from readers quite often who tell me that this is the best Honey Whole Wheat Bread recipe. I first published this recipe back in 2012, but I’m bringing it to the forefront today so you don’t miss this perfect bread recipe!
Watch the video showing you how to make this Honey Whole Wheat Bread, then scroll to the bottom of this post and print out the recipe so you can bake it at home.

The story behind this Honey Whole Wheat Bread recipe:
Before food blogs were popular, I visited food blog forums- places on the internet where you can discuss recipes and food. It’s where I became “RecipeGirl,” really… since that just happened to be the name I chose for my identity on those forums. I learned so much from people in those forums- home cooks, emerging bloggers and cookbook authors too. If you posed a question on those forums, members would openly share feedback, give recommendations and share their great grandmother’s secret recipes. It was a fun place to be.
Sadly, the forums no longer exist. The bread I’m sharing today is a recipe that a gentleman named “Pete” on Cooking.com’s forum gave me many years ago. Pete gave me permission to share the recipe he had been using for 40+ years! We lost Pete a few years ago, but I’m happy to let his famous bread recipe live on! I’ve been using this recipe since he gave it to me, and it’s now my go-to, homemade Honey Whole Wheat Bread.
Let me just state for the record that I’m not a very experienced bread baker. I haven’t made a zillion different kinds of loaves, and I usually look to the experts for recipes and advice. But this guy Pete… he gave me a good recipe that is easy to follow.

Tips for Making the Best Honey Whole Wheat Bread:
- When I make bread, I always make sure I have freshly purchased flour (I used the bread flour in combination with whole wheat flour). It makes a difference. You can make the dough by hand if you want to (mix and knead yourself), but if you have a stand mixer with a dough hook… it will do all of the work for you!
- Use freshly purchased yeast too. There is no “proofing the yeast” in this recipe. Just mix, let it knead and then shape it into a round to let rise.

The round of dough is placed into a bowl, which is set in a warm place with a clean dishtowel on top. Just let it rise until it’s about doubled.

The dough is divided in half and rolled into rectangles.

Then, here’s the funny part: you roll it up just like you roll up cinnamon roll dough. No kiddin’.

Then you wiggle it into a 9×5-inch bread pan. Cover it again- warm place and let it rise…

…until it has risen about an inch above the pan. Then bake it!

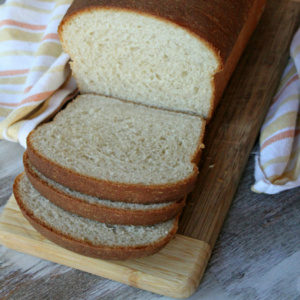
This Honey Whole Wheat Bread is the best sandwich bread recipe. And since there tend to be so many preservatives in those commercial brands, you can feel good about eating this bread homemade and feeding it to your family too.
P.S. Don’t be afraid of trying to bake your own bread. As I mentioned before… I’m not a bread baker! Just follow the instructions and try it out. You’ll be surprised how easy it is!
Here are a few more bread recipes you might enjoy:
- White Sandwich Bread
- Delicious Gluten-Free Bread
- Homemade Bread Bowls
- Crockpot Bread Baking
- Cinnamon Swirl Bread
Honey Whole Wheat Bread
Ingredients
- 2 cups whole wheat flour
- 4 cups bread flour (more, as needed)
- 2 tablespoons granulated white sugar
- 1½ teaspoons salt
- Two .25-ounce packets active dry yeast
- 1/4 cup honey
- 1 2/3 cups water
- 2/3 cup 1% milk
- 1/4 cup (1/2 stick) unsalted butter
- additional flour, as needed
Instructions
- In a large mixing bowl, whisk together the the whole wheat flour, 4 cups bread flour, sugar, salt and yeast.
- In a medium bowl, combine honey, milk, water and butter, and heat to between 105 and 110 degrees in the microwave.
- Stir the liquids to melt the butter and add, all at once, to the dry ingredients in the mixer bowl.
- With the dough hook installed on your stand mixer, mix the dough. Add more bread flour by the tablespoon, as needed, until the dough comes together and clears the bowl. Mix for 5 minutes with the dough hook and remove to a lightly floured counter surface.
- Knead by hand until no longer sticky, adding flour as necessary. Form the dough into a large round and place in a large, greased bowl.
- Cover the bowl with plastic wrap or a clean dish towel, let rise in a warm place for 30 minutes (or until about doubled in size). Remove the dough from the bowl and divide it in half. Roll each half into a 10 x 12 rectangle and roll each up like a cigar. Pinch the seams. Roll on the counter-top to make a uniform log and place each roll in an oiled 9x5-inch bread pan seam-side up. Shake the roll to oil the bottom, turn the pan over, catch the dough and reinsert it into the pan, seam-side-down.
- Return the pan to a warm place, cover lightly with a clean dishtowel and let rise an additional 30 minutes or until at least 1 inch above the pan top. Bake in a preheated 400°F. oven for 25 minutes, or until the center of the bread tests 190 to 200 degrees. Remove the bread from the pans and let them cool on a rack.
Notes
- If you don't have a stand mixer, you can mix and then knead the bread by hand. It'll be a bit of a workout, but it's worth it.
- To create a nice, warm place for your loaves to rise, turn on oven for 60 seconds and then turn it off. Turn the oven light on too. The temperature should be just about right for your loaves to rise nicely. (don't forget to turn off the oven!)
- Want a buttery component to it? Brush butter onto the top of the loaf as soon as it comes out of the oven. Let it soak into the loaf, then remove the loaf from the pan to cool.
- If you do not plan to consume both loaves right away, they freeze beautifully. Wrap loaf with foil as soon as it comes out of the oven- just foil, nothing else- the wrapping-while-hot trick retains the moisture so when thawed it's very fresh tasting.
- Over-kneading and adding too much flour may result in a drier, denser loaf. Be careful.
Nutrition
Nutrition information is automatically calculated, so should only be used as an approximation.


Your loaf looks wonderful! I made some bread this weekend from an old Farm Journal cookbook that I have. The recipe was also called Honey Whole Wheat Bread. It was a little different, yet similar, than yours but, wow did it taste good. It is going to have to become a regular in our house. I have to agree with a few of the other posters–it is really scary what the ingredients are in store bought bread. I painted mine with an egg wash and sprinkled 2 of the loaves with poppy seeds (1 was plain). Perfectly pretty!
I love working with yeast doughs. I baked all our breads for years but quit doing it a while back. This recipe is very similar to my standard loaf recipe and it really makes me want to get back into bread baking. Thanks for the reminder of how enjoyable and rewarding baking is.
That it is quite encouraging that you are not a bread expert either as neither am I! Especially trying to make a healthier bread, even more challenging! I’ve tried one recipe from another blogger and it was a flop. Thanks for sharing because it really doesn’t look too difficult!
I love homemade bread! Nothing beats it!! Your’s looks amazing!!!
I can’t wait to try this! I’ve just started baking my own bread, and my family has really appreciated it. There is just nothing like that smell when it’s baking 🙂
Your bread looks absolutely beautiful as the photo demonstrates so well
That bread came out pretty amazing! I’ll look forward to trying it next. I made whole wheat bread yesterday, hoping to post it soon (first time using instant yeast – it worked well). Nothing homier than fresh baked bread!
Bread is the one thing that I do not normally bake myself, but I’m going to give this a try. It looks delicious.
I can’t wait to try this bread! Looks amazing–so fluffy!
I have heard this phrase so many times: “I’m not a bread baker, but try this recipe, it’s so easy” NOT. But let me tell you, I am so impressed with this one and with myself..hehe. It turned out beautifully. Thank you, especially from my daughter, Isabella, who loves bread.
You made it already?? Yahoo!