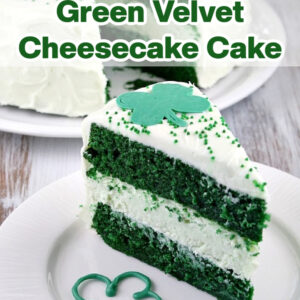
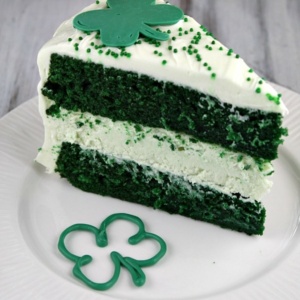
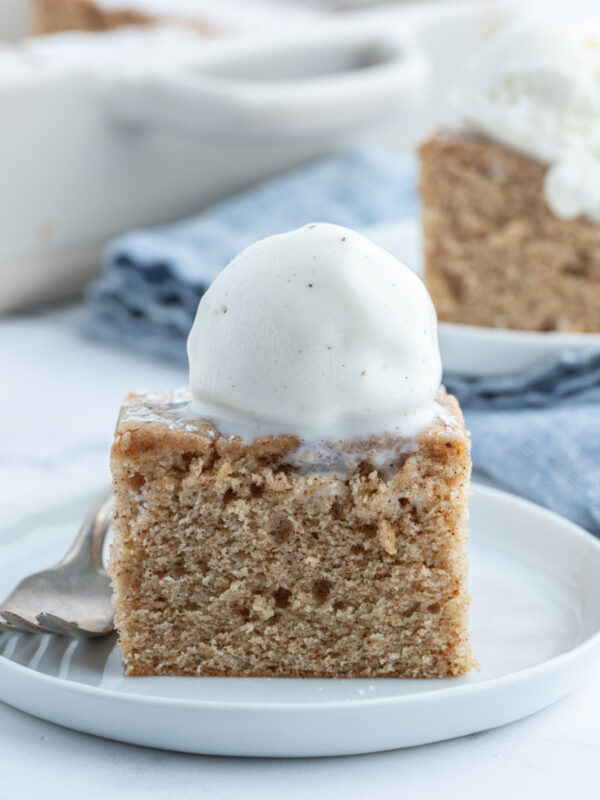
This Green Velvet Cheesecake Cake is a traditional red velvet cake made with green food color instead of red. So if you’re a red velvet cake fan and you love things like red velvet cupcakes, you’ll like this green velvet cake version just as much. This from-scratch cake is made up of two layers of green velvet cake with a layer of cheesecake in the middle. It’s covered with plenty of marshmallow cream cheese frosting.

St. Patrick’s Day is coming up soon, and because I have a very Irish (and proud of it) husband– it’s my duty to share a few St. Paddy’s Day recipes. Cheesecake-in-the-middle cakes are so darn good, so it was time to make a green velvet version. I’ve made red velvet cheesecake cake, strawberry cheesecake cake, carrot cake cheesecake cake and so many more. They need to be available in every flavor!
A velvet cake is one that has a “velvet” texture. It should turn out moist, tender and delicious. This green velvet cake recipe is simple to make, and the layer of cheesecake in the middle is a big time bonus. It tastes just like red velvet cake. The only difference is the color. Normally, a velvet cake contains cocoa powder, but we’ve left it out of this recipe. It tends to darken the green to an unappetizing dark green color, and you don’t want that!

What you’ll need:
- Cream Cheese: Use full fat cream cheese, and it should be at room temperature.
- Eggs: Use large eggs, and they should be at room temperature.
- Sour Cream: Use room temperature, full-fat sour cream
- Cream: Heavy whipping cream or heavy cream is what you need for this recipe.
- Baking Basics: All purpose flour, white sugar, baking soda, salt and vanilla extract
- Green Food Coloring: You can either use liquid or gel. You’ll need a tablespoon or so of liquid food coloring or you can use a bright green gel color (use your judgement on amount).
- Canola or Vegetable Oil: Oil will give your cake a lighter and fluffier texture than butter.
- White Vinegar: The addition of vinegar to a velvet cake is that it helps create a moist and tender texture.
- Buttermilk: It adds some tangy flavor, and it contributes to the tender texture of the cake.
- Butter: Use salted for more flavor in the frosting. It helps balance out the sweetness.
- Marshmallow Creme: This is an amazing addition to buttercream frosting to create the marshmallow flavor.
- Powdered Sugar: Sift out any lumps before using.
How to make Green Velvet Cheesecake Cake:
A plain and delicious cheesecake is tucked in between two layers of green velvet cake. After you bake the cheesecake in a springform pan, you just have to freeze it for a few hours and then it is firm enough to pick up, trim slightly and place between the two layers of cake.

How to apply a crumb coat layer of frosting:
Use a long, thin spatula or knife to cover the cake completely with a thin and even layer of frosting. Wipe off the spatula each time you’re about to dip it back into the bowl to get more frosting (this way you won’t be transferring any green crumbs into the bowl of frosting). Don’t worry at this point about the crumbs being visible in the frosting on the cake. When your cake has a thin layer of frosting all over it, place it into the refrigerator for 30 minutes to “set” the frosting. Once the first layer of frosting is set, apply the second layer.
Recipe Tips:
- You can certainly bake this cheesecake in the oven without a water bath, but you run the risk of cracking the top of the cheesecake. The water bath is a safeguard against cracking.
- Measure your cheesecake layer against the cake layers. If the cheesecake layer turns out to be slightly larger size round than your cake layers, move it to a cutting board and use a knife to gently shave off some of the exterior of the cheesecake.
- You can use the green velvet cake portion of the recipe to make cupcakes instead. The batter will yield about 24 cupcakes.

What you will love about this green velvet cake recipe:
- It’s extremely tasty. I love the marshmallow cream cheese frosting and the cheesecake surprise in the middle. The green velvet cake is moist and tender.
- The cheesecake layer defrosts quickly to create a wonderfully creamy middle layer to the cake. It’s like having a giant layer of frosting, but it’s CHEESECAKE!
- It’s a lovely cake to serve for St. Patrick’s Day or a birthday!
- And it’s super easy to switch out the food coloring to make blue velvet cake, orange velvet cake, purple velvet cake or whatever color velvet cake you want to make.

PRO Tip
Green velvet cheesecake will have the best flavor when served at room temperature. If you are serving this cake at a party, it’s perfectly okay to leave the cake at room temperature for a couple of hours (the cheesecake thaws very quickly). Otherwise, keep it stored in the refrigerator. It also freezes perfectly. Freeze it as is, then wrap it in plastic wrap and store it in the freezer until it is needed. Leftover slices may also be wrapped and frozen.

How to make decor for a St. Patrick’s Day Cake:
If you’d like a little bit of St. Patrick’s Day bling, melt some green candy melts (available at craft stores) and pipe some 4-leafed clover shapes or shamrocks on waxed paper. When they dry, you can pick them up and add them to the decor of your cake.

If you’re looking for more St. Patrick’s Day desserts, you might like to try:
Green Velvet Cheesecake Cake
Ingredients
CHEESECAKE:
- Two 8-ounce packages cream cheese, at room temperature
- ⅔ cup granulated white sugar
- pinch of salt
- 2 large eggs
- ⅓ cup sour cream
- ⅓ cup heavy whipping cream
- 1 teaspoon vanilla extract
GREEN VELVET CAKE:
- 2½ cups all purpose flour
- ½ teaspoon salt
- 1½ cups canola or vegetable oil
- 1½ cups granulated white sugar
- 2 large eggs
- 1 teaspoon vanilla extract
- 1 teaspoon white vinegar
- 1 teaspoon baking soda
- 1 cup buttermilk
- 1 tablespoon (½ of a 1-ounce bottle) green food coloring (alternately, you can use gel paste)
FROSTING:
- Two 8-ounce packages cream cheese, at room temperature
- ½ cup (1 stick) salted butter, at room temperature
- One 7-ounce jar marshmallow creme
- 1 cup powdered sugar
Instructions
PREPARE THE CHEESECAKE LAYER:
- Preheat the oven to 325℉. Place a large roasting pan on the lower third rack of the oven. Place a kettle of water on the stove to boil. Spray a 9-inch springform pan with nonstick spray and line the bottom with a round of parchment paper. Wrap a double layer of heavy duty foil around the bottom and up the sides of the pan (you want to seal it so the water from the water bath doesn’t seep into the pan).
- In a large bowl, use an electric mixer to blend the cream cheese until it is smooth and creamy, 1 to 2 minutes. Mix in the sugar and salt and blend for 2 minutes, scraping down the sides of the bowl to make sure all is mixed in. Add the eggs, one at a time, blending after each addition. Finally, mix in the sour cream, whipping cream and vanilla. Mix until smooth. Pour the batter into the prepared pan. Set the pan into the roasting pan in the pre-heated oven. Carefully pour the hot water from your kettle into the roasting pan. Pour enough water so that there is about an inch of water coming up the foil along the sides of the cheesecake pan.
- Bake the cheesecake for 45 minutes. It should be set to the touch and not jiggly. Remove the cheesecake from the roasting pan and let it cool on a wire rack for at least an hour. When it has cooled, place the pan into the freezer and let the cheesecake freeze completely (4 to 5 hours or overnight).
PREPARE THE CAKE LAYERS:
- Preheat the oven to 350℉. Spray two 9-inch round pans with nonstick spray and line each pan with a round of parchment paper (see *Tips). In a medium bowl, sift together the flour and salt. In a large bowl, combine the oil and sugar together and beat with an electric mixer for 2 minutes. Add the eggs, one at a time, and the vanilla, and beat for an additional 2 minutes.
- In a small bowl, combine the vinegar and baking soda and stir to dissolve. Add the vinegar to the bowl, along with the buttermilk and food coloring. Beat on medium-low speed for 1 minute, until blended. Add the dry ingredients and increase speed to medium-high, scraping down the sides of the bowl while mixing, for 2 additional minutes. Divide the batter evenly between the prepared pans. Bake 30 to 35 minutes, or until a toothpick inserted into the center comes out with a few moist crumbs attached. Let the cakes cool for 20 minutes. Run a knife along the edge of the pans, then invert the cakes onto a rack to cool completely.
PREPARE THE FROSTING:
- In a large bowl, using an electric mixer on medium-high speed, combine the cream cheese and butter and beat until creamy and smooth. Add the marshmallow creme and mix until smooth. Add in the powdered sugar and continue to beat, scraping down the sides of the bowl, until all of the ingredients are mixed in and the frosting is smooth and spreadable.
ASSEMBLE THE CAKE:
- Place one cake layer into the center of a cake plate or platter. Remove the cheesecake from the freezer, take off the sides of the pan, and slide a knife under the parchment to remove the cheesecake from the pan. Peel off the parchment. Trim the cheesecake, as needed to match the size of your cake layers (see *Tips). Place the cheesecake layer on top of the first cake layer. Place the second cake layer on top of the cheesecake.
FROST THE CAKE:
- Apply a crumb coat layer of frosting to the cake (see *Recipe Notes below), and refrigerate the cake for 30 minutes, or until the frosting is set. Apply the second layer of frosting. Add a large scoop of frosting onto the top of the cake. Use a long, thin spatula or knife to spread the frosting evenly across the top and then spread it down the sides of the cake too. Decorate, as desired.
Notes
- *You can certainly bake this cheesecake in the oven without a water bath, but you run the risk of cracking the top of the cheesecake. The water bath is a safeguard against cracking.
- *Measure your cheesecake layer against the cake layers. If the cheesecake layer turns out to be slightly larger size round than your cake layers, move it to a cutting board and use a knife to gently shave off some of the exterior of the cheesecake.
- *How to apply a crumb coat layer of frosting: use a long, thin spatula or knife to cover the cake completely with a thin and even layer of frosting. Wipe off the spatula each time you’re about to dip it back into the bowl to get more frosting (this way you won’t be transferring any green crumbs into the bowl of frosting). Don’t worry at this point about the crumbs being visible in the frosting on the cake. When your cake has a thin layer of frosting all over it, place it into the refrigerator for 30 minutes to “set” the frosting. Once the first layer of frosting is set, apply the second layer.
- *If you are serving this cake at a party, it’s perfectly okay to leave the cake at room temperature for a couple of hours (the cheesecake thaws very quickly). Otherwise, keep it stored in the refrigerator. It also freezes perfectly. Freeze it as is, then wrap it in plastic wrap and store it in the freezer until it is needed. Leftover slices may also be wrapped and frozen.
Nutrition
Nutrition information is automatically calculated, so should only be used as an approximation.


One of my favorite cakes!!
I always love a cheesecake cake and Recipe Girl’s are the best. I’ve made many different ones and they never disappoint. Bringing this to a St. Patrick’s Day luncheon.